Welcome to our tutorial on using Python and pandas to create a database of past NHL data! Whether you are a beginner programmer or an experienced data analyst, this tutorial is designed to walk you through the process step-by-step and create a winning data set. We will start by setting up our Python environment and installing the necessary libraries, then move on to web scraping techniques using pandas to gather data from various NHL websites. Finally, we will cover how to clean, transform, and store the data in a structured format, such as a CSV file or a SQL database.
By the end of this tutorial, you will have a solid foundation in web scraping and data manipulation using Python and pandas, and you will have your very own NHL data set to use for analysis and visualization. So let's get started! No prior coding experience is necessary – we will provide clear and concise instructions along the way.
Here's a sneak-peek at what we will be making:
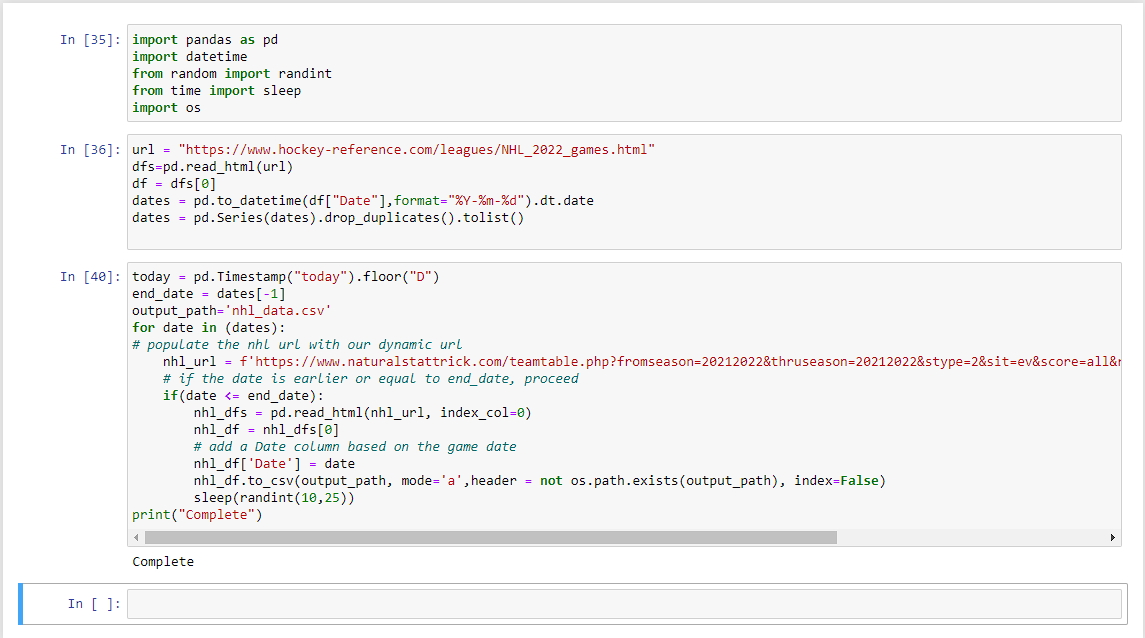 I promise, it's more powerful than it looks.
Getting started
Anaconda is a popular open-source distribution of Python that comes pre-loaded with a wide range of libraries and tools for data science, machine learning, and scientific computing. In this tutorial, we will use Anaconda to set up our Python environment and install the necessary libraries for web scraping and data manipulation, including pandas and requests. Anaconda makes it easy to get started with Python and its ecosystem of powerful data science libraries, and it comes with a user-friendly package manager called conda that makes it easy to install, update, and manage packages. If you don't already have Anaconda installed on your system, don't worry – we will provide step-by-step instructions on how to download and install it in the next section.
To install Anaconda on Windows:
- Go to the Anaconda website (https://www.anaconda.com/products/individual).
- Click the "Download" button for the Python 3.x version.
- Once the download is complete, double-click the installer file to start the installation process.
- Click "Next" on the first screen of the installation wizard.
- Read the Anaconda End User License Agreement, select the "I Agree" checkbox, and then click "Next".
- Select the destination folder where you want to install Anaconda and click "Next". It is recommended to use the default installation location.
- Select whether you want to add Anaconda to your PATH environment variable. It is recommended to select the default option "Add Anaconda to the PATH environment variable". Click "Next".
- Click the "Install" button to begin the installation process.
- Click "Next" when the installation is complete.
- Click "Finish" to complete the installation process and launch the Anaconda Navigator.
To install Anaconda on Mac:
- Go to the Anaconda website (https://www.anaconda.com/products/individual).
- Click the "Download" button for the Python 3.x version.
- Once the download is complete, double-click the installer file to start the installation process.
- Follow the prompts to install Anaconda.
- Once the installation is complete, open the terminal and type "conda" to ensure that the installation was successful. If you see a list of commands, the installation was successful.
Note: If you are having trouble with the installation process or have any questions, it is recommended to consult the Anaconda documentation or seek assistance from the Anaconda community.
Congrats! Anaconda should now be successfully installed on your machine.
In the next section, we will look at using one of the built-in tools, called Jupyter Notebook, which will allow you to easily visualize your python code in a step-by-step way.
To open Jupyter Notebook:
- Open the Anaconda Navigator from the start menu (Windows) or the Applications folder (Mac).
- Click the "Jupyter Notebook" icon under the "Launch" button.
- A new window will open in your default web browser with the Jupyter Notebook dashboard.
- From the dashboard, you can navigate to the directory where you want to create a new notebook or open an existing one.
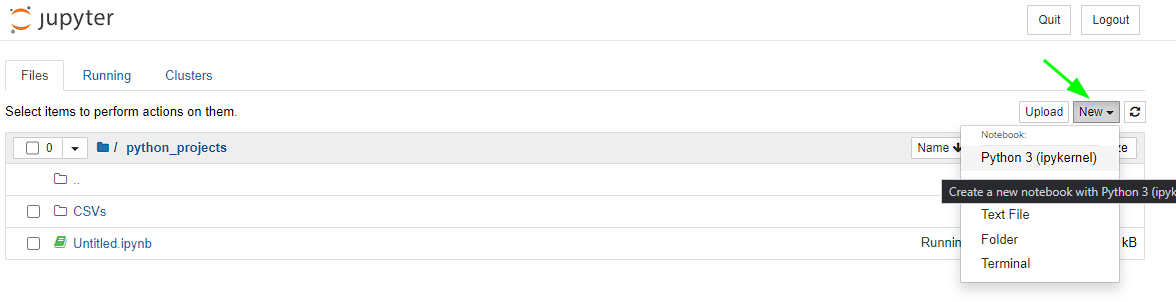
- To create a new notebook, click the "New" button at the top right of the dashboard and select "Python 3" from the dropdown menu. This will open a new notebook in a new tab in your web browser.
Alternatively, you can also launch Jupyter Notebook from the command line by typing jupyter notebook in the terminal. This will open the Jupyter Notebook dashboard in your default web browser.
You should now see a blank project:
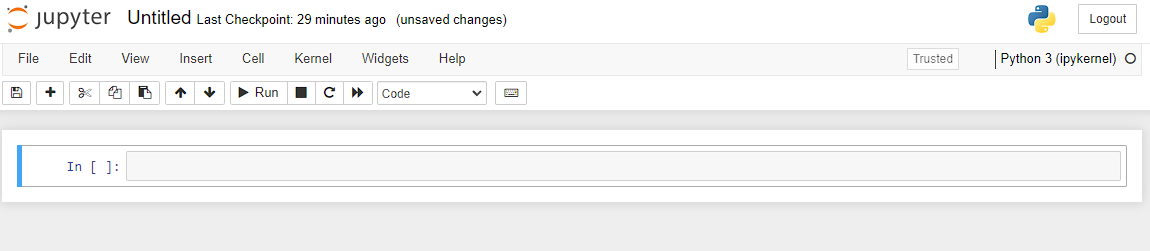
Congrats! We are ready to start coding.
To add code to a cell in a Jupyter notebook, simply click on the cell and type in your code. To run the code, you can either press shift+enter or click the "Run" button in the toolbar above.
To start with, we will import Pandas, which is a powerful library for data manipulation and analysis in Python. It provides easy-to-use data structures and data analysis tools for handling and manipulating large datasets. With pandas, you can efficiently load, process, and analyze large datasets, and easily perform operations such as filtering, grouping, and pivoting.
Importing libraries
To import pandas, type:
import pandas as pd
In the code example above, pd is just a shortened version of pandas. This is a common convention when working with pandas, as it allows you to type less and save some typing. However, you are free to use any name you like when importing the pandas library. For example, you could do the following:
import pandas as my_awesome_library
The name you use when importing the library is referred to as an "alias." Using an alias when importing a library allows you to use a shortened version of the library's name, which can make your code easier to read and write. However, keep in mind that if you use a different alias, you will need to use that alias instead of
pdthroughout your code when calling pandas functions.
In general, it's a good idea to choose an alias that is descriptive and easy to remember. This will help you avoid confusion and make it easier to work with the library in your code.
We will also import a few other useful libraries that will be needed later:
import datetime
from random import randint
from time import sleep
import os
So your first cell should now look like:
import pandas as pd
import datetime
from random import randint
from time import sleep
import os
You can now press shift+enter (or click "run" in the top nav) to run this block of code and install your dependencies.
Scraping the data
We are going to be scraping data from two sites, one to gather historical game dates, and the other to actually gather the data from those historical games.
Let me explain.
To scrape historical game data, we first need to know the dates on which games were played. If we just ran our program to scrape stats on every day of the year, it would waste a lot of computing resources, time and engergy. And you would also run the risk of running into errors.
So to combat this, it would be great to have a list of dates where we know games were played. That way, we can feed those dates into our data scraper, responsible for gathering historical stats.
Important note:
For this tutorial, we are using the pd.read_html() function from the pandas library that is used to parse HTML tables from a webpage into a list of pandas dataframes.
It is different from building a web scraper in that it is specifically designed to extract tables from HTML, whereas a web scraper is a more general tool that can be used to extract any data from a webpage.
One key advantage of using pd.read_html() is that it is much easier to use than building a web scraper from scratch. It requires minimal code and is able to handle a wide variety of HTML table formats, making it a convenient tool for quickly extracting data from webpages. However, it may not be as flexible as building a custom web scraper if you need to extract data that is not contained in an HTML table.
Getting historical dates
To get the historical dates, we will use the following website: https://www.hockey-reference.com/.
Hockey reference already displays their data in structured HTML tables, making it a great choice to use with the read_html function.
The full URL we will use in this tutorial is: https://www.hockey-reference.com/leagues/NHL_2022_games.html which will provide us with all of the games played in the 2021-2022 season. Note that the URL parameter NHL_2022... references the end of the season. (At the time of writing, entering 2023 would yield results for the 2022-2023 season to date).
Now, to read this data in our juypter notebook, we first need to do a few things.
First, we will create a few new variables
What is a variable?
In Python, a variable is a named location in memory that is used to store a value. When you create a variable, you give it a name and assign it a value using the assignment operator
=. For example:x = 5 y = "hello" z = [1,2,3]In this example,
xis a variable that stores the value5,yis a variable that stores the string value'hello', andzis a variable that stores a list of values[1, 2, 3]. Variables are useful because they allow you to store and manipulate data in your code. You can use variables to perform calculations, store the results of those calculations, and then use the results in other parts of your code. For example:x = 5 y = 10 z = x + y print(z) # prints 15In this example, the variables
xandyare used to store values, and the result of the calculationx + yis stored in the variablez. The value ofzis then printed to the console.
It's important to choose descriptive and meaningful names for your variables to make your code easier to read and understand. It's also a good idea to follow Python's naming conventions, which recommend using lowercase letters, digits, and underscores, but no spaces or special characters.
The first variable we will create, we will call url and it will hold the value of our url string.
url = 'https://www.hockey-reference.com/leagues/NHL_2022_games.html'
Note that we wrap the url string in '' or "" this is important. If you do not do this, things will break. This is because text in python is known as a string. A string is a sequence of characters that represent text. Strings are denoted using single quotes (') or double quotes ("), and can contain letters, digits, and other characters.
The next variable, we will call dfs, again, this can be any unique name, but as it will store the initialization of our dataframe, I have chosen to use dfs.
It will look like:
dfs = pd.read_html(url)
Notice that we are using the read_html() function as mentioned earlier. Inside the function, we pass the url variable. This is the same as writing pd.read_html("https://www.hockey-reference.com/leagues/NHL_2022_games.html") but is much easier to read and saves us typing.
It also means if we were to update the season, we could update it once in the url variable, and it would save us from having to update it everywhere else we might want to use that same url.
To recap so far, our first cell has our dependencies:
import pandas as pd
import datetime
from random import randint
from time import sleep
import os
and our second cell contains (so far):
url = "https://www.hockey-reference.com/leagues/NHL_2022_games.html"
dfs=pd.read_html(url)
Nice!
Let's keep going.
On a new line, if you were to write dfs and run the cell (shift+enter), it would output an ugly looking table. You would recoginize some of the cells and the team names, but it wouldn't be very useful information... yet. This is because the webpage actually has two separate tables, Regular Season and Playoffs.
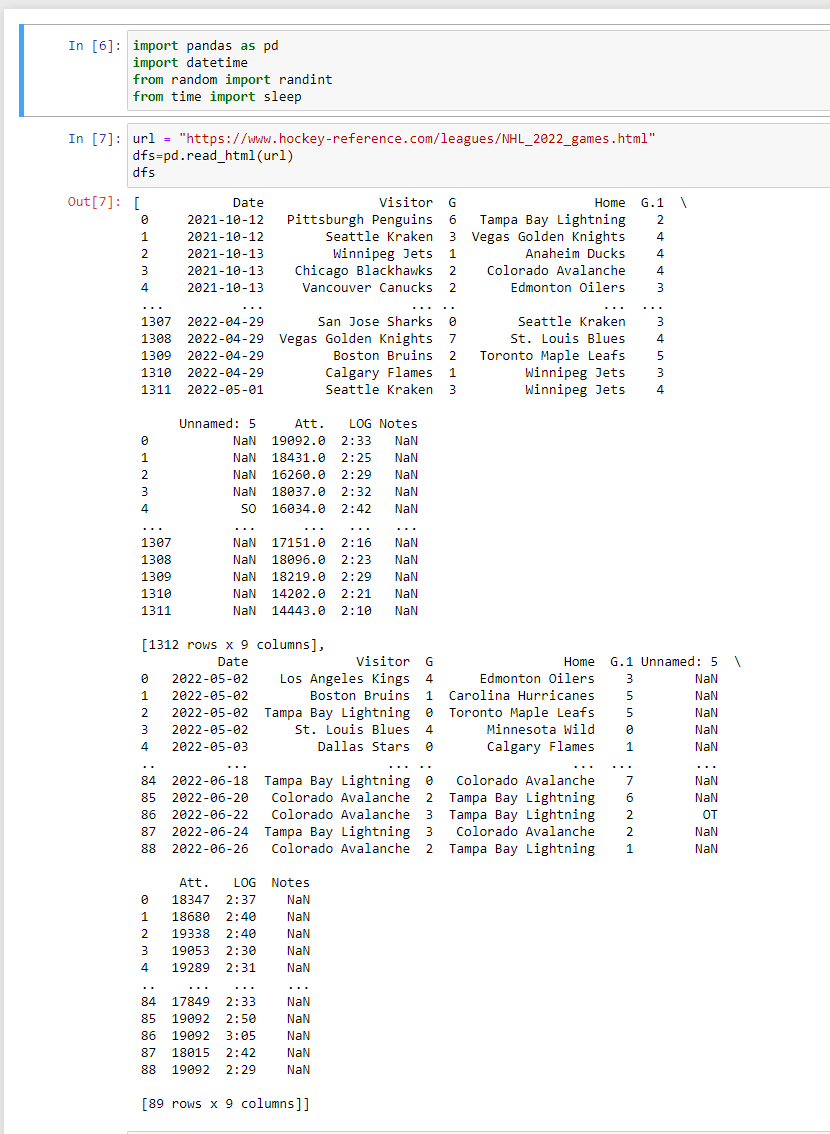
For our example, we only want regular season data, so to get that, we will reference the regular season table using an index. If you've ever used the importHTML function in Google Sheets before, this should feel a bit familiar.
In most programming languages, counting is zero-indexed, which means the first element of a list has an index of 0, the second of 1 etc. For instance, if we have a list of fruits:
my_list = ['apple', 'banana', 'cherry']In this list, the first element (
'apple') has an index of 0, the second element ('banana') has an index of 1, and the third element ('cherry') has an index of 2.
So, to get the first table, we will create a new variable called df and it will reference the zeroth index of the dfs variable, as such.
df = dfs[0]
Here, we are using bracket notation to reference the index.
Now, running on a new line df will return the following:
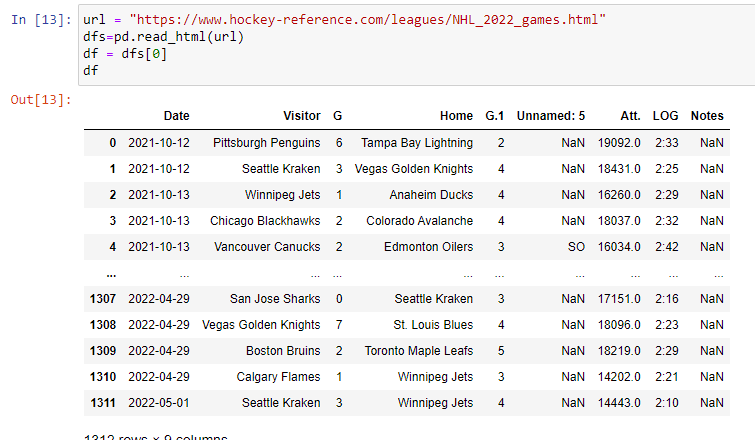
A beautifully formatted table. Notice we did not have to do anything special to have this table look nice. Pandas does it for us!
The next step, is to get the dates out of this table so we can use them later on.
To do this, we will use pd.to_datetime().
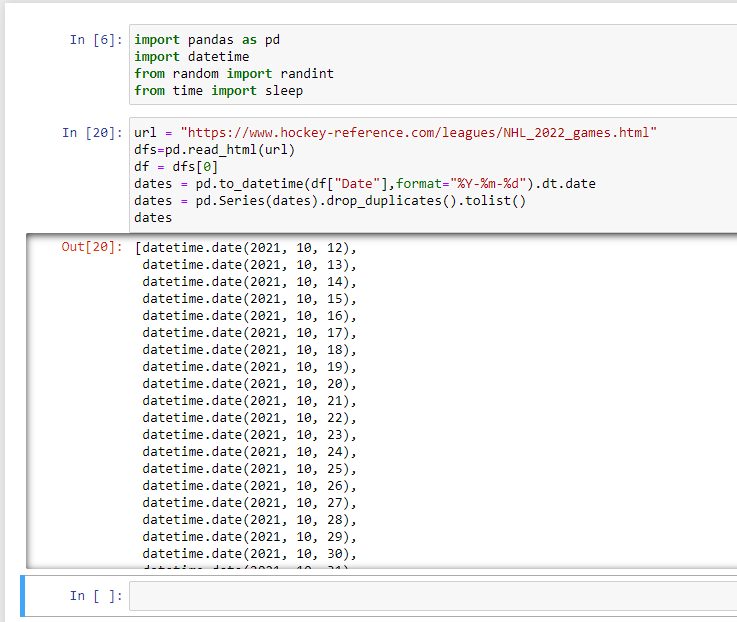
We will create a new variable called dates and it will hold our converted dates as such:
dates = pd.to_datetime(df["Date"],format="%Y-%m-%d").dt.date
The pd.to_datetime() function is part of the pandas library and is used to convert a column of data in a dataframe to datetime objects. The format parameter specifies the format of the input data, in this case "%Y-%m-%d" which is the ISO-8601 date format (YYYY-MM-DD).
The .dt.date attribute is a datetime attribute that extracts the date component (year, month, and day) from a datetime object and returns it as a date object.
If we were to run the cell, it would look like this:
 A list of all of the dates. Excellent.
But now we have another issue, I bet you can guess what it is.
We have the same dates listed multiple times (one for every game played on a given day)... this is not ideal!
To fix this, we will use a few more handy functions.
We will override our dates variable with the following:
dates = pd.Series(dates).drop_duplicates().tolist()
First, the pd.Series() function is used to create a pandas Series from the dates variable. Then, the drop_duplicates() method is used to remove any duplicate dates from the Series. Finally, the tolist() method is used to convert the resulting Series to a list.
Voila.
We now have a list of all unique dates for the NHL in the 2022 season.
Still with me?
Now it's time for the fun part.
Scraping team data
The first part of this tutorial was getting set up, understanding some of the basics, and gathering the dates, which will be crucial going forward.
In this section, I will show you how to use those dates to gather historical team data.
To start, we will look at the site where we will collect the historical team data; Natural Stat Trick. NST is a great resource with tons of advanced stats, and as a bonus, their data is housed in HTML tables, making it easily accessible for us to use.
https://www.naturalstattrick.com/teamtable.php?fromseason=20212022&thruseason=20212022&stype=2&sit=ev&score=all&rate=y&team=all&loc=B&gpf=410&fd=&td=
with just a few filters applied, you can see a ton of useful stats collected. But we don't want the season stats, we want stats for each game, right?
So, to do this, we can make use of something in python called f strings.
An f-string (formatted string literal) is a string that is prefixed with the letter "f" and allows you to embed expressions inside string literals, using . The expressions inside the curly braces are evaluated and the resulting values are formatted and placed inside the string.
Here's an example of an f-string in Python:
name = 'Alice'
age = 30
# Using an f-string to print a string with variables
print(f'Hello, my name is {name} and I am {age} years old.')
This code would print the string "Hello, my name is Alice and I am 30 years old." The variables name and age are embedded in the string using and are automatically converted to strings and inserted into the final string.
F-strings are a convenient way to create and format strings in Python, as they allow you to easily combine variables and static text in a single string. They are also easier to read and write than other string formatting methods, such as the % operator or the .format() method.
We will apply this to our url, and make use of the fd=&td= query parameters on end of the url.
For instance, if I only want to receive data for the first day of the season, October 12, 2021, I could create a new dataframe that looks like this:
nhl_df = pd.read_html(f'https://www.naturalstattrick.com/teamtable.php?fromseason=20212022&thruseason=20212022&stype=2&sit=ev&score=all&rate=y&team=all&loc=B&gpf=410&fd={"2021-10-12"}&td={"2021-10-12"}')
You can see that I am using an f-string, and that I have added the date "2021-10-12" to the fd and td query parameters.
Think about how we could clean this up?
Rather than typing the date twice, we could create a new variable, called date
and change our code as such:
date = "2021-10-12"
nhl_df = pd.read_html(f'https://www.naturalstattrick.com/teamtable.php?fromseason=20212022&thruseason=20212022&stype=2&sit=ev&score=all&rate=y&team=all&loc=B&gpf=410&fd={date}&td={date}')
Now, we only need to update the date variable in one place. Progress!
Putting it all together
To put everything together, at a high level, we will loop through the list of dates we collected and use that date in our url. From there, we will need to store that data somewhere before moving on to the next date.
For the purposes of this tutorial, we will store our data set in a CSV, but you could very easily store this in a SQL database as well, if that were your preference.
First, if you created a date variable above, delete it. But you can leave the date param in your end url. This is because we will be creating our date in a bit of a different way in the loop.
Let's get set up with a few variables.
nhl_url = ''
This will be a blank string for now.
today = pd.Timestamp("today").floor("D")
The above code creates a pandas Timestamp object representing the current date, and then "floors" it to the start of the day (midnight). The
pd.Timestamp()function is part of the pandas library and is used to create a Timestamp object representing a specific date and time. The string "today" passed as an argument to the function creates a Timestamp object representing the current date and time. Thefloor()method is then called on the Timestamp object, with the argument "D" (for "day"), to round the Timestamp down to the start of the day (midnight). This effectively removes the time component from the Timestamp, leaving only the date.
Strictly speaking, as we are using historical data, we likely won't actually need this variable, but it would come in handy if you implement this for in-season data (as I am sure most of you will!).
Next, we will create a variable called end_date
end_date = dates[-1]
This variable finds the last date in the list of dates created earlier. We will need this to know when to end our loop.
In Python, list indices can be negative, in which case they count from the end of the list. For example, dates[-1] refers to the last element of the list, dates[-2] refers to the second-to-last element of the list, and so on. This can be useful for accessing elements at the end of a list without knowing the exact length of the list.
output_path is the name of the variable that we will use for our csv output. I will call my csv nhl_data.csv so my variable will look like:
output_path = "nhl_data.csv"
Pro tip make sure you don't forget to add
.csvto the end of your filename.
Creating the loop
Here is the code for our loop:
Note: in python,
#denotes a comment, and is not part of the actual code. It is just a way to add human-readible notes within your code
# loop through each date in the dates list
for date in (dates):
# populate the nhl_url with our dynamic url.
# Notice that we are now using the `date`
# to populate fd and td params.
# fd={date}&td={date}
	nhl_url = f'https://www.naturalstattrick.com/teamtable.php?fromseason=20212022&thruseason=20212022&stype=2&sit=ev&score=all&rate=y&team=all&loc=B&gpf=410&fd={date}&td={date}'
	# if the date is earlier or equal to the `end_date`, proceed
	if(date <= end_date):
		nhl_dfs = pd.read_html(nhl_url, index_col=0)
		nhl_df = nhl_dfs[0]
		# add a Date column based on the game date
		nhl_df['Date'] = date
		nhl_df.to_csv(output_path, mode='a',header = not os.path.exists(output_path), index=False)
		sleep(randint(10,25))
print("Complete")
This code is iterating through a list of dates (specified by the variable dates) and using those dates to create a URL for a website. The URL is then used to scrape a table from the website using the read_html() function from the pandas library. The table is then stored in a pandas DataFrame object called nhl_df.
The code then adds a new column to the DataFrame called "Date" and sets the value of this column to the current date being processed in the loop. The DataFrame is then saved to a CSV file using the to_csv() function, with the mode parameter set to 'a' to append the data to the file (if it already exists) rather than overwriting it.
Finally, the code uses the sleep() function (which is a built-in function in the time module) to pause the program for a random amount of time between 10 and 25 seconds, using the randint() function (which is a built-in function in the random module) to generate a random integer within that range.
After the loop has finished iterating through all of the dates in the dates list, the code prints the string "Complete" to indicate that the process is finished.
Time to run your code
Woohooo! We made it. Click the run button, or shift+enter to run the code. If you want to make sure everything runs smoothly, you can also click "Kernel" and choose "Restart and run all", but this is not necessary, as long as you have run every cell so far.
Here is what it should look like when complete:
Go get a coffee, this will take a while
Important you might be wondering about the sleep() function. We do this for a number of reasons, both for our benefit and the benefit of the owner of the website. This could be done for a variety of reasons, such as to rate-limit requests to a website to avoid overwhelming the server with too many requests in a short period of time, or to simulate a more natural browsing behavior to avoid being detected as a scraper.
Using the sleep() function in this way can also help to make the scraping process more efficient by allowing the program to pause and wait for the website to fully load before attempting to scrape the data. This can be especially useful if the website being scraped has a lot of data or is running slowly, as it can help to prevent errors or timeouts that may occur when trying to scrape the data too quickly.
It's also worth noting that using the sleep() function in this way can help to make the scraping process more fair to the website being scraped, as it allows the server to process requests from other users in between requests from the scraper. This can help to prevent the scraper from using too many resources on the server, which could negatively impact the performance of the website for other users.
This can feel like it is taking a long time, but don't panic. Once everything is complete, a "Complete" notification will be printed in the jupyter notebook.
Once the process has completed, head to the directory where your code is and you should see a csv created with your data inside. Pretty neat!
Remember, we are waiting an average of 17.5 seconds between every iteration of the loop, so it will take some time. But if you don't add the sleep() function, you will get rate-limited and potentially even have your IP black-listed which would be disastrous.
Once complete, you will have an entire season's worth of game data, game-by-game that you can use to do further analysis or start building a model.

Look at all that glorious data!
A note on errors
Errors are a part of programming, whether you are just beginning or a seasoned veteran. When an error occurs, remember, computers do exactly as they are told. Take a step back, read the error message and do your best to decipher what is going on. Google is also your friend.
For this specific example, I have tested it myself, and can confirm everything is working at the time of writing. Please make sure that you are closely checking for typos, missing parenthesis etc.
Here are some common errors that new python programmers might encounter:
-
Syntax errors: These are errors that occur when the Python interpreter encounters a line of code that it doesn't understand, usually because of a typo or because the code is written in a way that doesn't follow the proper syntax for the language. Syntax errors can be difficult for new programmers to spot, as they often involve small mistakes that are easy to overlook.
-
Indentation errors: In Python, indentation is used to denote blocks of code that should be executed together. If the indentation of a block of code is incorrect, it can cause an indentation error. This can be especially confusing for new programmers who are used to languages that use curly braces or other markers to denote blocks of code.
-
Variable naming errors: In Python, variables must be named using only letters, numbers, and underscores, and they must start with a letter or an underscore. If a programmer tries to use a variable name that doesn't follow these rules, it can cause a variable naming error.
-
Type errors: In Python, variables have specific types (such as integers, floating point numbers, strings, etc.), and it's important to use the correct type when working with them. If a programmer tries to use a variable in a way that doesn't match its type, it can cause a type error. For example, trying to add a string and an integer together would cause a type error.
-
Import errors: Python allows programmers to import code from other modules (sets of functions and variables that are stored in separate files). If a programmer tries to import a module that doesn't exist, or if there is a typo in the module name, it can cause an import error.
-
Index errors: In Python, lists and other sequence types are indexed starting at 0. If a programmer tries to access an element of a list using an index that is out of range (for example, trying to access the 10th element of a list that only has 9 elements), it can cause an index error.
These are just a few examples of the types of errors that new Python programmers might encounter. It's important to keep in mind that it's normal to make mistakes while learning to program, and with practice and persistence, you'll become more skilled at identifying and fixing errors in your code.
Next Steps
Now that you've seen to do this for one season, I recommend gathering 4-5 seasons worth of data. Since you've set up the framework, you would only need to update your variables for different seasons.
Also remember, we used the variable
end_datein our final code. If you were scraping present season data, you would want to swap that out to thetodayvariable that we created and didn't end up using. This would ensure that you get all games season-to-date.
Hint: We still have a few hardcoded pieces of code, for instance the dates url using hockey reference could be changed to be more dynamic.
How you choose to proceed is up to you, but I hope this gives you some good insight as to how you can start using python to gather data and easily import it to Excel or Google sheets!
Don't forget to sign up using code WELCOME20 for $20 off your first month at Action Backers.
Thanks for reading and don't forget to subscribe on YouTube and follow me on Twitter. ✌️